Print Size Advisor: Visualize How big you Should your print your Fine Art Prints
Ordering a print is always a leap of faith. Will it fit the wall? Will it be too small to make an impact, or too large for the space? Will it clash with the other frames around it? Is a close-up portrait better than a wide shot for that corner of the living room? And how much will that large format actually cost?These are the questions you want answered before the print arrives at your door.
Our tool lets you upload a photo of your room and place your image directly on the wall, giving you a realistic preview of the final result before you commit. You’ll be able to compare sizes, check proportions, and get an estimated cost for your print.
Of course, we always recommend double-checking with your own measurements before ordering.
Table of Contents
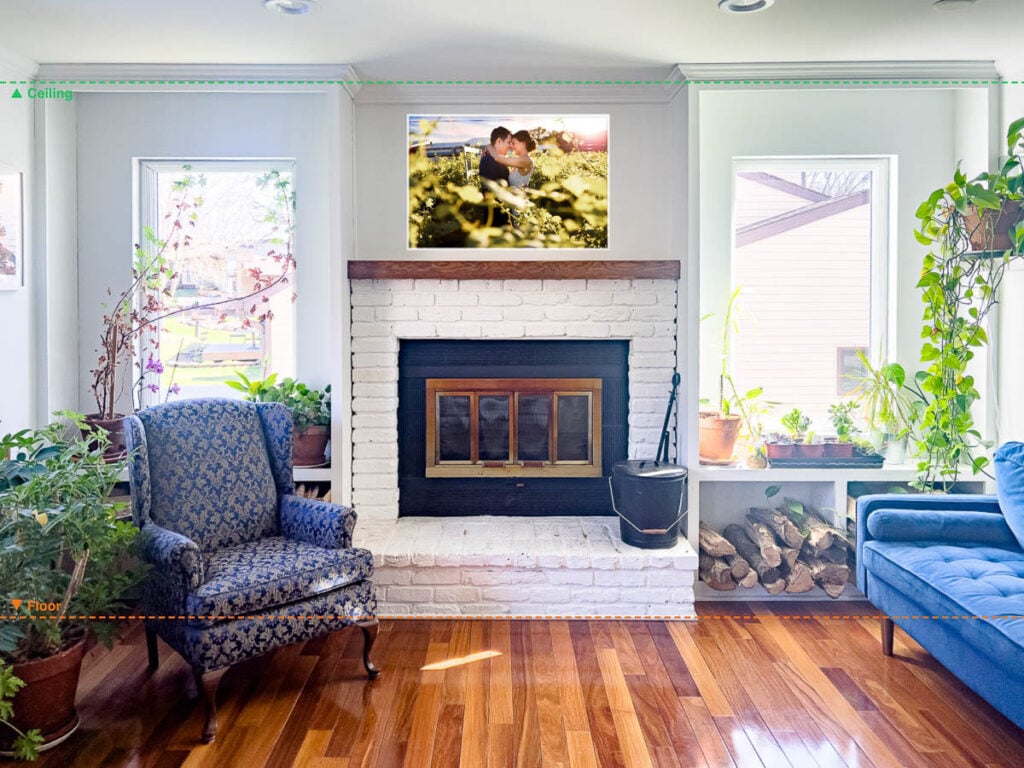
Start Visualizing your futur print on your wall
Upload the photo you want to print — it will appear in the frame with proper cropping.
How to use our tool
- Step 1: Upload a photo of your Room
Take (with your phone) a straight-on photo of your wall (no angle).
Accepted formats: .jpg, .jpeg, .png, .webp (max 10MB) - Step 2 : Adjust the Height of your Ceiling.
Move the ceiling and floor line to meet the ones in your photos.
Pick your ceiling height. - Step 3: Upload the photo file
Upload the photo you want to print in high resolution.
Accepted formats: .jpg, .jpeg, .png, .gif, .webp (max 10MB) - Step 4: Set Print Size
Pick dimensions (recommended: same ratio as your image)
Drag the preview to position it on your wal - Step 5: Check Quality
Look at the quality indicator to make sure your desired size would work great.
Save your simulation.
Does Your File Have Enough Resolution?

How many Pixel do you need: The DPI Confusion
For inkjet printing, the standard for fine art and photo printing, 300 DPI or 240 DPI (depending on the technology) are the gold standard. At that resolution, your print will look sharp and detailed when viewed up close.
But the human eye has limits. Beyond a certain distance, it simply cannot distinguish individual pixels, meaning a lower resolution print can look perfectly sharp if you’re not standing right in front of it.
In other words, if you print an image on 40×60 inch, you don’t (always/necessary) need it to be extra sharp.
But if you will look at an image close you want to image to be as sharp as possible (which is the case for wedding album).
That’s why, our tool estimates resolution requirements based on inkjet printing for fine art output.
Note: If you’re printing on canvas, metal, or acrylic, the recommended resolution is generally lower. Those surfaces are more forgiving, and canvas texture in particular naturally masks pixel detail. The required definition change regarding the printing technology involved. Photographers use different technology for different type of printing.
2 Fun Facts about large print and low resolution
To illustrate how the distance impact the real required resolution:
- In France, the standard Parisian 4×3 subway billboard measures 3 x 4 meters (approximately 9.8 x 13.1 feet) and requires a minimum resolution of 2,362 x 3,150 pixels to achieve 20 DPI at full size.
- in the USA, the standard American highway Bulletin is significantly larger at 14 x 48 feet (approximately 4.3 x 14.6 meters) (yes everything is bigger in the USA) and requires a minimum resolution of 1,512 x 5,184 pixels to meet the 9 DPI standard for long-distance viewing.
That said, new LED billboard require even less than that!
Conclusion : consider where will be hang your print, and from where you look at it.
Resolution Reference Table
Here is a reference table for inkjet printing.
Resolution requirements table for fine art inkjet printing by print size and DPI
| Print size | 300 dpi (gallery quality) | 240 dpi (professional) | 180 dpi (standard) | 120 dpi (large format) |
|---|
Pixel dimensions = width only. Height scales proportionally with the same DPI.
Quality guide: excellent crisp at close viewing good great at normal viewing distance fair acceptable for wall display.
Switch between inches and centimeters using the toggle above the table.
You need at least one side of your image to have the number of pixel displayed to have a good result.
Glossy vs. Matte
Glossy paper demands more sharpness than matte. The reflective surface amplifies every detail, including soft pixels. If your file is borderline on resolution, matte or lustre finish will be significantly more forgiving than glossy.
Discover Our Fine Art Prints, Made In-House
We produce our fine art prints ourselves, from start to finish, on professional inkjet equipment. No third-party lab, no middleman, no guessing.
For mounting, our top recommendation is aluminum composite backing (Dibond-type), where your print is face-mounted and flush-bonded to a rigid aluminum panel. The result is sleek, contemporary, and built to last. No frame needed. No warping. Just the image, clean and sharp on your wall. It is, in our opinion, the most elegant way to display a fine art print.
Handling everything in-house means we control the full chain from color calibration to final output. Faster turnaround, tighter quality control, and a direct conversation with the person who actually made your print.
If you want other kinds of printing (such as canvas, metal), we would suggest to check on of those labs.
Get Better Results From Your Files
A file that looks great on screen does not always translate directly to print. Screen light is emitted; print light is reflected. Contrast behaves differently. Shadows that look rich on a monitor can go flat on paper.
Before we print anything, we work on your image. This means fine-tuning local contrast, opening up shadow detail where it matters, adding targeted sharpening to key areas like eyes, textures, and edges, and making sure the tonal range holds across the full print size. The larger the print, the more this preparation matters.
Think of it as the difference between a straight export and a print-ready master. We do not skip this step.
Ready to print your photos?