Golden Hour Calculator & Sunset: Planning Your Photos with Perfect Light
Let’s talk about something absolutely crucial for your photos: sunlight! As your photographer, I want to help you understand how we can use the sun’s magic to make your engagement session and wedding day photos stunning. This is your guide to “chasing the light,” and we’ll even use a special sunlight calculator to help us pinpoint the perfect times.
I will explain to you what a good soft light is, and on the opposite, what kind of light to avoid (noon in June). I will quickly cover what is this famous golden hour, and provide you with a golden calculator.
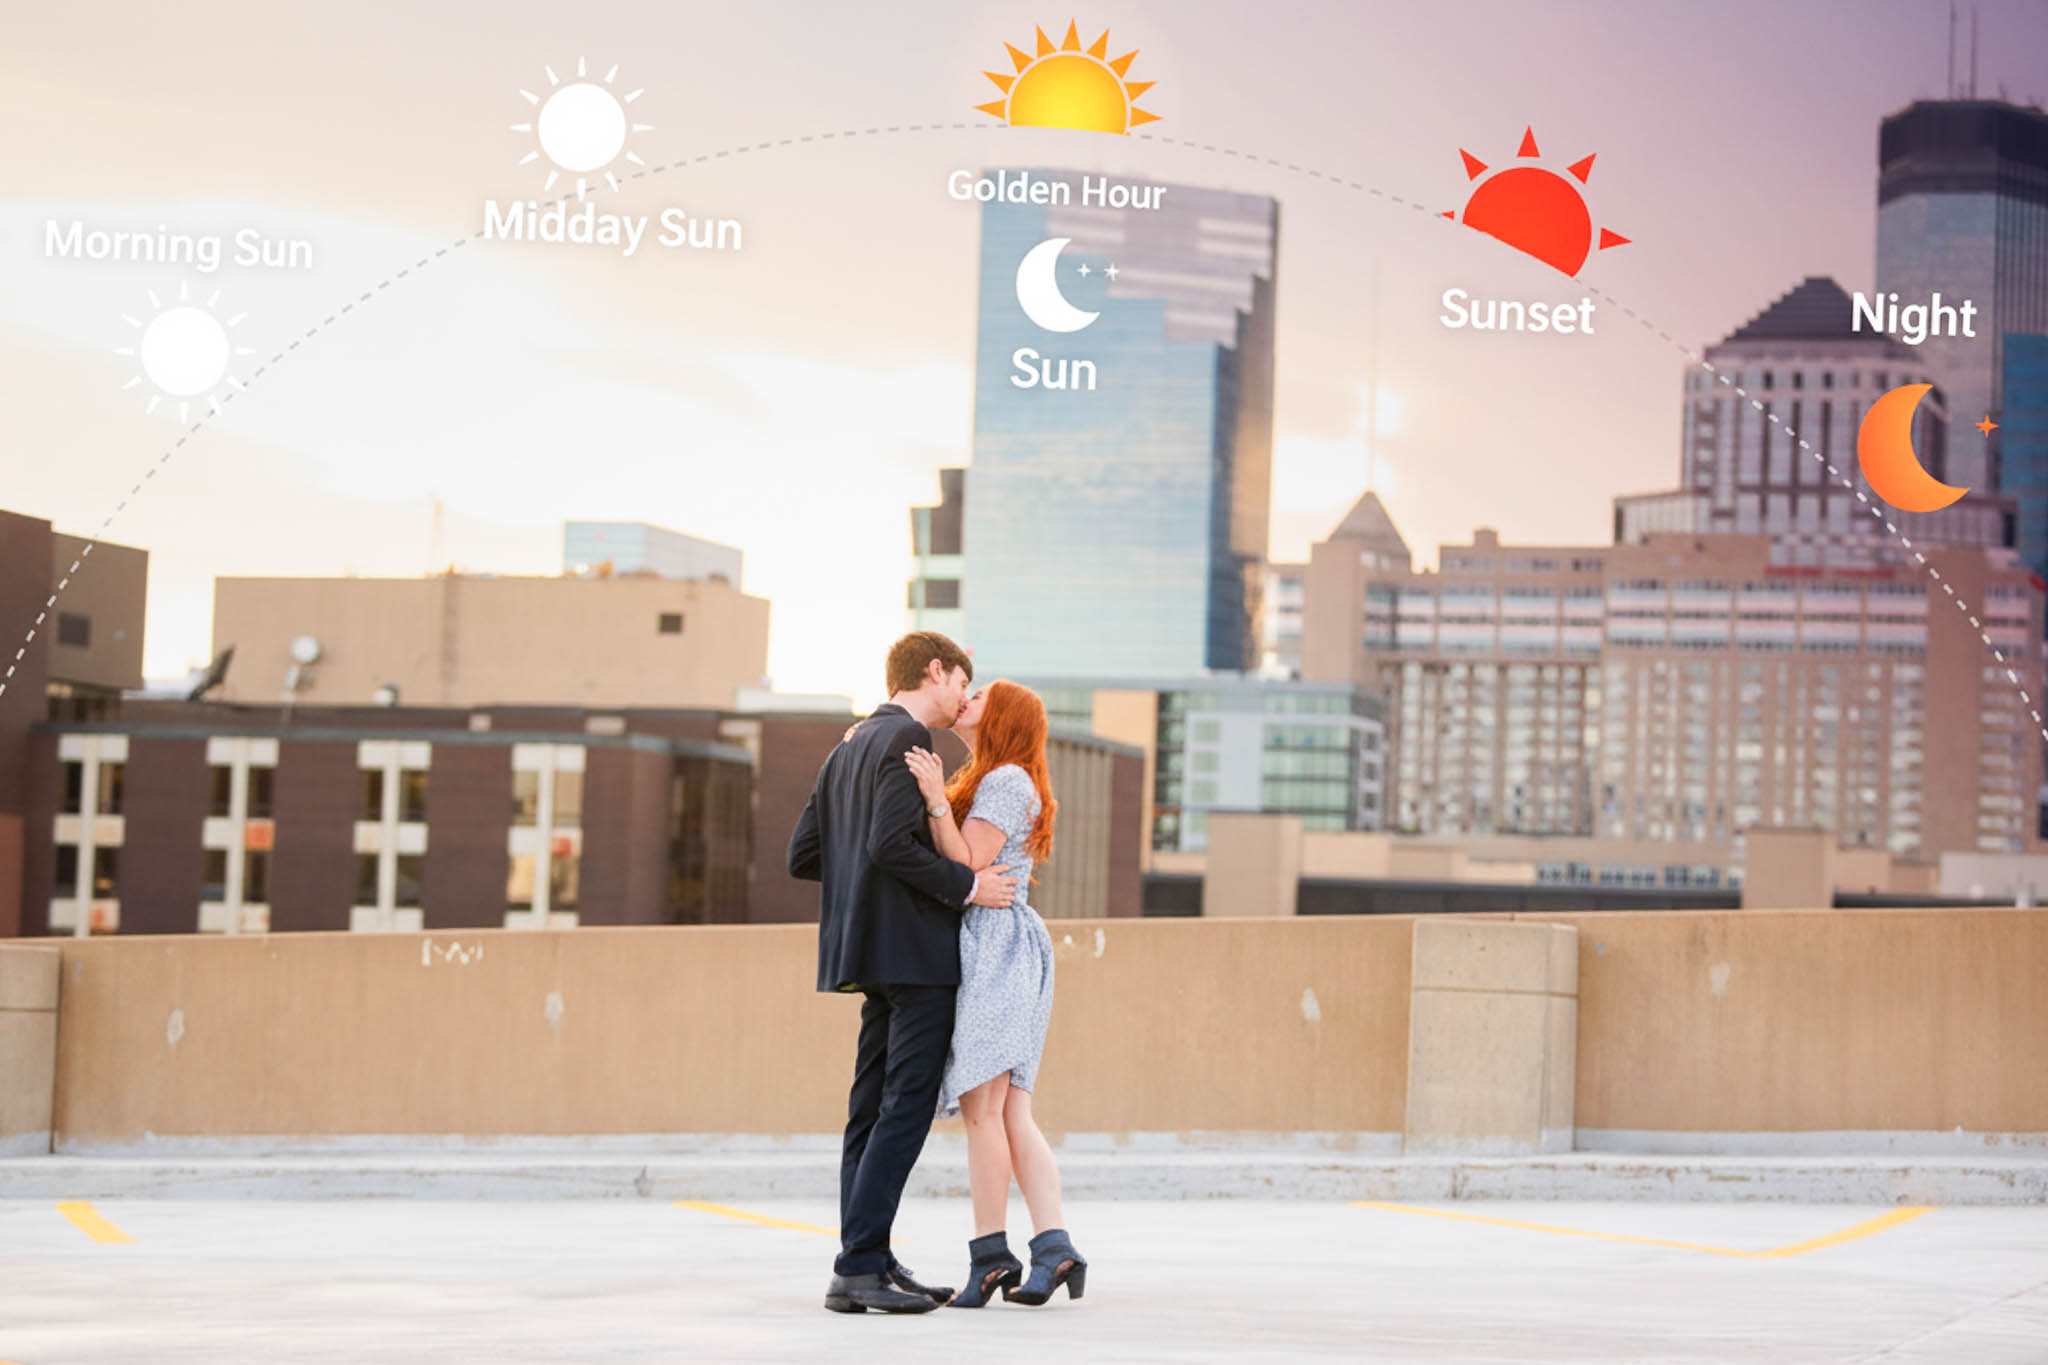
Table of Contents
Understanding Light: The Key to Amazing Photos
So, what do I, as your photographer, mean when I talk about “good light”? Think of it like this: good light is your best friend on your wedding day. It’s the kind of light that makes you both look absolutely radiant. But what makes light “good”? It mainly comes down to two key things: its direction (where it’s coming from) and its quality (whether it’s soft or hard).
1. The Direction of Light:
This is simply where the light source (like the sun) is coming from in relation to you.
- Front Light: The light source is directly in front of you. When soft, it lights your faces clearly. If it’s a harsh front light (like direct midday sun), it can cause squinting and flat images.
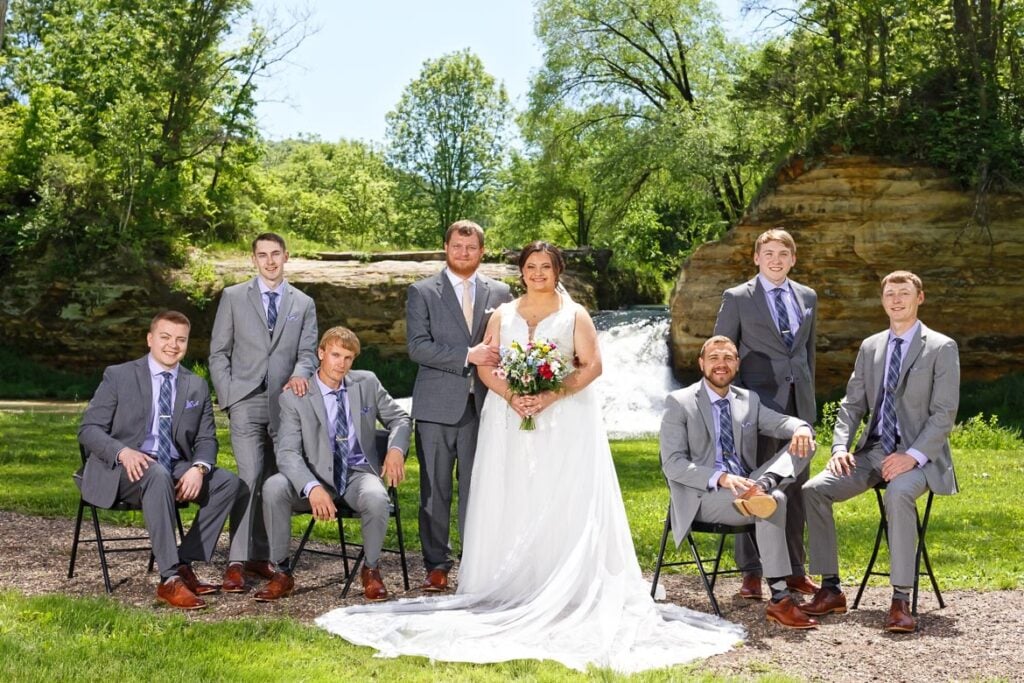
- Side Light: Light comes from your left or right. This creates beautiful dimension and shape, highlighting textures in your outfits and adding depth. Soft side light is very flattering for portraits.
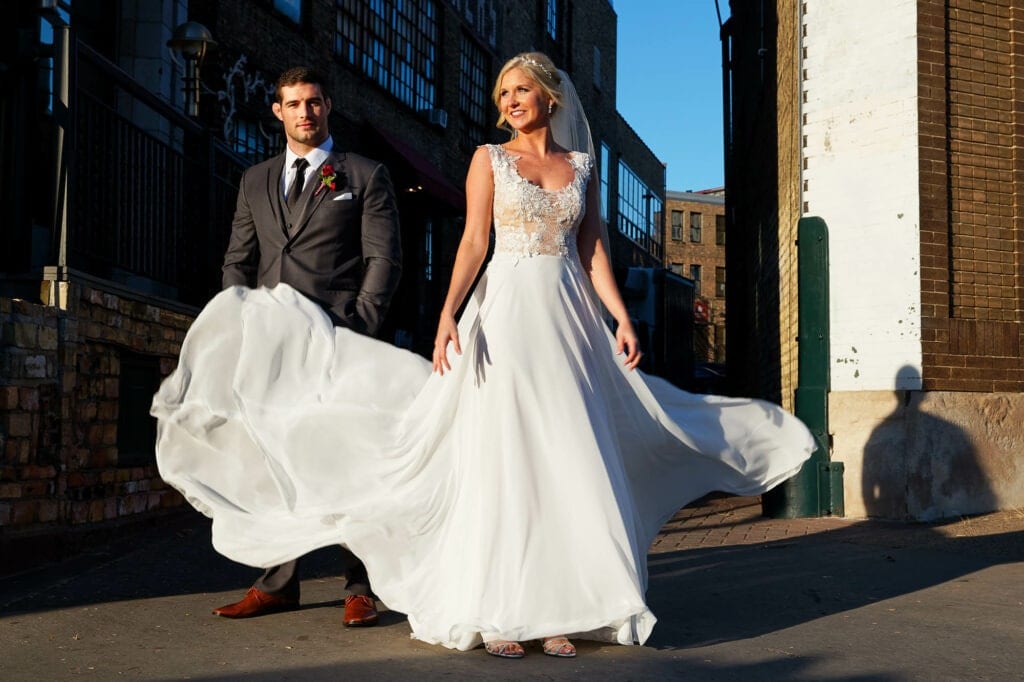
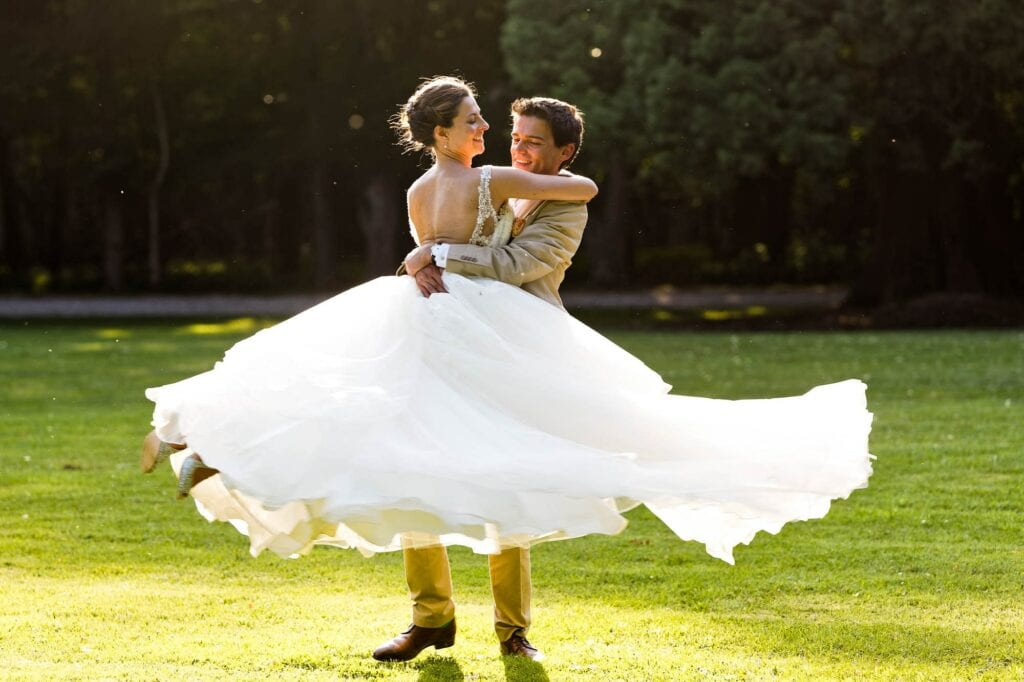
- Backlight: The light source is behind you. This is a favorite for romantic wedding photos! It creates a beautiful glow around your hair and outlines your silhouette, making you stand out from the background.
2. The Quality of Light: Soft vs. Hard
This refers to how the light wraps around you and the kind of shadows it creates.
- Hard Light: This comes from a small, intense light source like the direct, unobscured sun on a clear day. It creates very sharp, dark, and defined shadows. While it can be used for dramatic effects, for wedding portraits, it’s often unflattering, creating harsh lines or shadows on faces.
- Soft Light: This is the dream for portraits! Soft light is diffused and gentle, like on an overcast day when clouds act like a giant natural lampshade, or during golden hour. It wraps around you beautifully, minimizes harsh shadows, and gives your skin a smooth, lovely glow. It’s incredibly flattering and creates that magical, romantic mood.
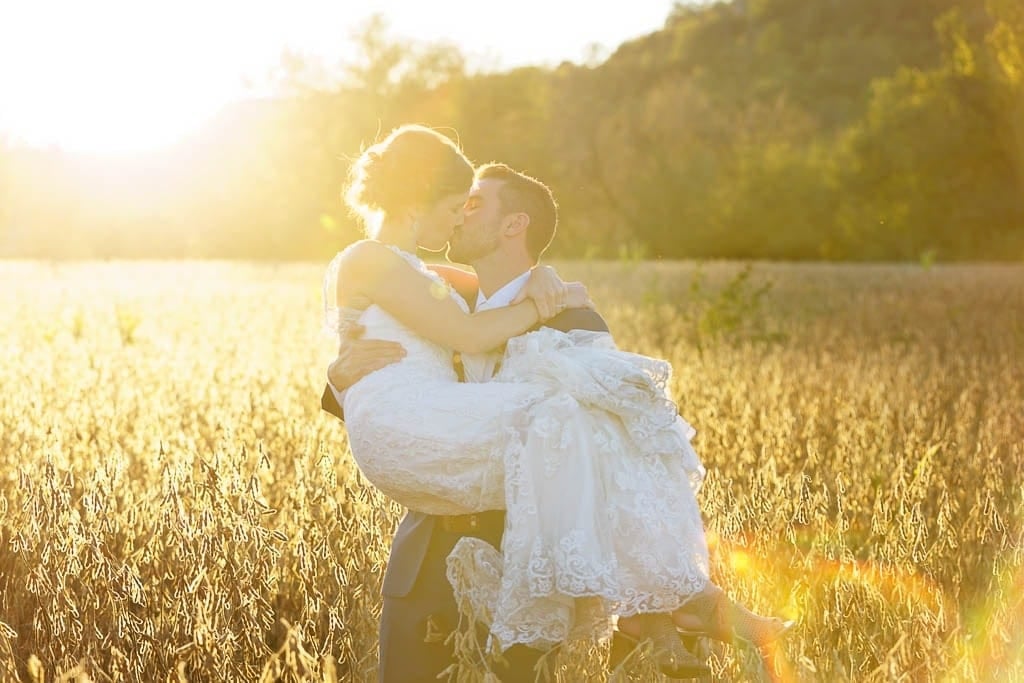
The Magic of Golden Hour: Perfect Quality and Direction
You’ve probably heard photographers rave about golden hour. It happens twice a day: shortly after sunrise and shortly before sunset. During these times, the sun is low in the sky. This low direction is key. Because the sun is at a low angle, the light travels through more of the atmosphere, which diffuses it and makes its quality wonderfully soft and warm.
Why Golden Hour is Great for Flattering Portraits
That soft, warm, directional light during golden hour is why it’s so prized. The soft quality means no harsh shadows on your faces; just even, gentle light that makes your skin look amazing and prevents squinting. The low direction of the sun allows us to play with light in creative ways, like backlighting.
Beautiful Backlighting in Golden Hour
Remember backlight, where the sun is behind you? Golden hour is perfect for this. The direction of the low sun creates that gorgeous rim light or halo effect on your hair. And because the quality of the light is soft, it doesn’t usually overpower you. It helps your bodies stand out beautifully from the background, adding depth and a touch of romance with its warm tones.
Midday Sun: Tricky Direction and Hard Quality
Now, let’s talk about the middle of the day. When the sun is directly overhead, its direction is from above, and its quality is very hard and intense. This combination can be tricky for photos. The overhead direction can create unflattering shadows under your eyes (often called “raccoon eyes”) and nose. The hard quality means these shadows are sharp and distinct. It also makes you want to squint!
Understanding “Bad Light”
So, when we talk about “bad light” for portraits, we’re usually referring to that hard quality of light coming from an unflattering direction, like the midday overhead sun. It can hide your beautiful features under harsh shadows and create too much contrast.
It also applies to your background.
At noon, the intense overhead sun makes directly lit background elements extremely bright while casting deep, sharp shadows, resulting in a heavily contrasted image. This also applies under trees, where sunlight piercing through leaves creates a dappled, non-uniform shade with bright hot spots instead of a consistent, soft shadow, further increasing the scene’s overall contrast.
Solutions for Tricky Light: Changing Quality and Direction
Don’t worry if your schedule means some photos happen when the sun is challenging! We have strategies:
- Seek Open Shade: The shade of a big tree or a building provides soft light. The tree or building blocks the hard direct sun, and the light that filters in is diffused and even, creating a much more flattering quality.
- Move Indoors: Window light can be beautiful! It’s often soft (especially from a large window not in direct sun) and directional, allowing us to sculpt with light.
- Using Flash: I can use my flash to improve the situation. I can use it to fill in harsh shadows caused by hard sunlight. With modifiers (like a softbox), I can even create my own soft, directional light, overpowering the less desirable natural light.
How Seasons Affect Light’s Direction and Quality
The time of year dramatically changes the light we work with:
Winter: The sun stays lower in the sky for much of the day. This means its direction is often more flattering for longer periods. The light quality can also be softer due to atmospheric conditions, giving us lovely light to work with throughout more of the day.
Summer: The sun gets very high very quickly, creating that hard, overhead light for many hours. This makes our golden hour windows (with their beautiful low direction and soft quality) shorter and even more precious. We’ll rely more on finding shade or using flash during the main part of a summer day.
Two types of light after sunset that I use for more artistic images
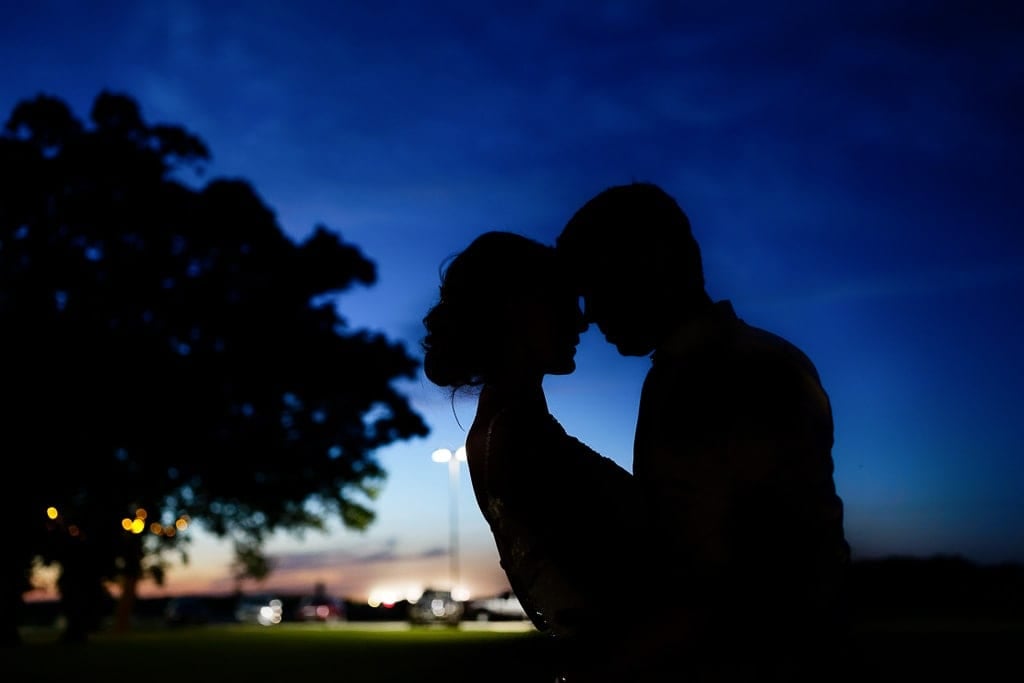
Blue Hour: Soft, Ambient Light
Right after the sun dips below the horizon (or just before it rises), we enter blue hour. The quality of light during blue hour is incredibly soft and even, almost shadowless. The direction is more ambient, coming from the overall sky, which takes on a beautiful, deep blue hue. It creates a calm, serene, and sometimes moody atmosphere.
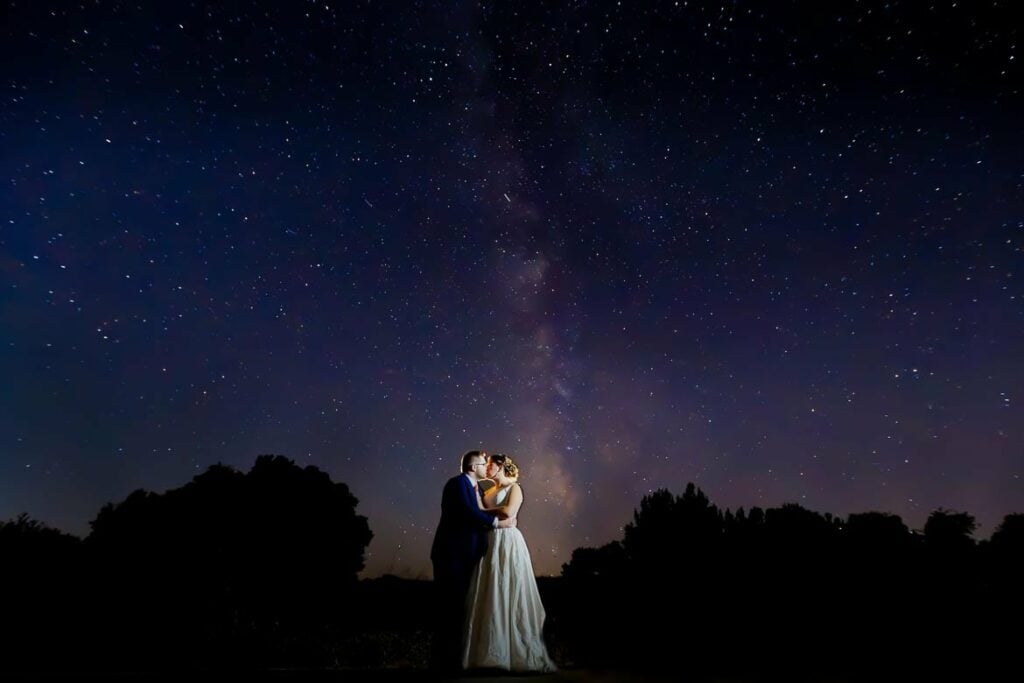
Pictures with the Stars
For truly epic photos with the stars and the Milky Way, we need the absence of unwanted light (like from the moon, the city, or the venue). The key here is a very dark, clear sky.
The “light” we are capturing is the faint light from distant stars, so direction and sunlight quality aren’t the primary concerns, but rather the darkness of the environment.
I will Steal You Away for Perfect Light
Your photos together as a newly married couple are so incredibly important. Because that gorgeous, soft light coming from the perfect direction (hello, golden hour!) often happens during your cocktail hour or even dinner (especially in summer), I might gently “kidnap” you. Stepping away for 15-20 minutes to capture portraits in the day’s best light will be completely worth it. These often become your most cherished images!
Planning around the sun’s direction and quality might seem like a detail, but it makes a huge difference. We’ll work together, using tools like a sunlight calculator to predict the best times, ensuring your engagement and wedding photos are everything you’ve dreamed of!
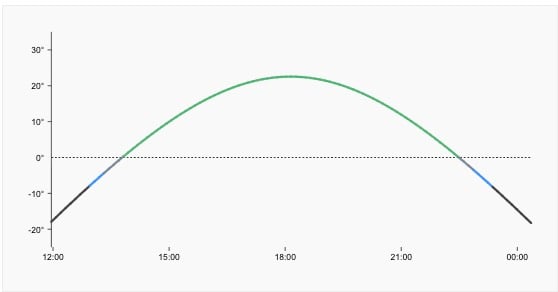
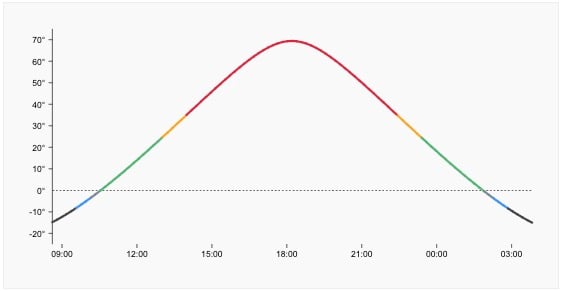
The Golden Hour Calculator for Minnesota
Photography Light & Sun Path Calculator - Minnesota
Golden hour: Best Light! Descent Light Harsh Light (avoid) Blue hour (artistic silhouette) Night Sky (picture with stars)
A Quick Note on Using the Sunlight Calculator at Your Venue
While our sunlight calculator gives us very precise astronomical times for sunrise, sunset, and those magical golden hours, it’s super important to also consider your specific venue’s surroundings: its typography. Think about things like rolling hills, tall buildings right next door, or a dense line of trees. These features can mean the sun might disappear from your specific photo spot a bit sooner than the official sunset time, or that golden light might hit a certain area later than expected. This is something we’ll definitely chat about, and it’s why understanding the venue layout is so key to our planning!
Frequently Asked Questions (FAQ)
Q1: What is this “sunlight calculator” you mentioned?
A: The sunlight calculator is a handy tool I use during our planning process! It helps us determine the exact times for sunrise, sunset, golden hour (when the light is soft and beautifully directional), and blue hour for your specific wedding date and location. This way, we can schedule your key photo moments to take advantage of the absolute best natural light.
Q2: How accurate is the sunlight calculator, and where does it get its data?
A: That’s a great question! The sunlight calculator I use sources its information from official astronomical data, so it’s very accurate, usually to within just a minute or two for things like sunrise, sunset, and the phases of twilight. When we plan your timeline, I always build in a little buffer around these calculated times just to be safe, as local conditions like terrain can slightly influence things.
Q3: How far in advance do you use the sunlight calculator to plan our timeline?
A: There’s really no limit! As soon as we have your wedding date and location locked in, we can start looking at the sunlight patterns. We’ll typically use it during our initial planning meetings to map out a rough timeline, and we can fine-tune things as we get closer. It helps us be proactive in scheduling those magic light moments!
Q4: Can we download or access an app/website to preview our sun path?
A: Yes, absolutely! If you enjoy a bit of DIY planning and want to visualize how the sun will move across your venue, there are some excellent tools out there. Smartphone apps like PhotoPills or Sun Surveyor are fantastic for this, as they can show you the sun’s arc on any given day and time. There are also web-based tools that can provide similar information. They can be really helpful for you to see what I’m seeing!
Q5: What happens if it’s cloudy or it rains on our wedding day? How does that affect the light?
A: Don’t worry! Cloudy days are fantastic because the clouds act like a giant natural diffuser, creating soft light from many directions. This is very flattering. If it rains, we can find beautiful indoor spots with soft window light, use covered outdoor areas, or even embrace the rain with some fun umbrella shots!
Q6: What if there’s unexpected cloud cover or haze during golden hour?
A: Light cloud cover or a bit of haze can actually be a photographer’s friend! They act as natural diffusers, softening the sunlight and creating a beautiful, gentle glow. It can make golden hour even dreamier. If the cloud cover becomes very dense and completely obscures the sun, we might not get those dramatic, colorful sunset sky photos. In that case, we’ll still have wonderfully soft, atmospheric light to work with for portraits, or we might decide to skip that specific “sunset shot” and focus on other beautiful photo opportunities.
Q7: Can we use intentional lens flare as a creative effect?
A: Definitely! I love incorporating intentional lens flare as a creative touch, and it’s one of the beautiful effects we can achieve, especially during golden hour. When the sun is at that low, directional angle, we can position you to get that lovely, warm flare that adds a touch of magic and romance to the images. Certain lenses and techniques help create this effect beautifully.
Q8: Should we coordinate our wardrobe colors with the light?
A: It’s not a strict rule, but it can be a nice touch! For golden hour photos, earth tones, muted colors, and pastels tend to photograph beautifully as they complement the warm, soft light. During brighter parts of the day, especially if we’re in direct, hard sun, very bright whites can sometimes reflect so much light that they risk losing detail or “blowing out.” We can always manage this, but it’s a little something to keep in mind if you’re considering outfits for an engagement session, for example.
Q9: Will venue architecture (overhangs, windows, etc.) change our light plan?
A: Yes, absolutely! Venue architecture plays a big role. When I scout a venue, I’m always looking at features like covered walkways, large windows, archways, or interesting structural elements. These can be fantastic tools! Overhangs create open shade, which gives us soft light. Large windows act as beautiful, directional light sources for indoor shots, especially if an indoor ceremony is planned and sunlight streams through. We’ll use these features creatively to shape light, find shelter from harsh sun, or add unique compositional elements to your photos.
Q10: What if our venue doesn’t allow us to step away during cocktail hour for golden hour photos?
A: That’s perfectly understandable, and we can definitely work around it! If golden hour coincides with a time you absolutely can’t step away, we have other options. We could schedule your portraits together before the ceremony, especially if you’re doing a first look. Sometimes, we can find a brief 10-15 minute window during dinner if the light is still beautiful. Or, we can focus on capturing stunning images at other times, utilizing the best available light, or even plan for some creative night portraits. The key is flexibility!
Q11: What happens if our timeline shifts on the wedding day?
A: Wedding days are wonderfully dynamic, and timeline shifts can happen! Please don’t stress about this. I always build some flexibility into our photo plan. We’ll stay in communication throughout the day. If things get delayed or timings change, we adapt. We might adjust the length of a particular photo session, find an alternative time for those golden hour shots if the original window is missed, or prioritize certain photos. My goal is to capture the essence of your day beautifully, no matter what little surprises it brings.
Q12: Do you bring artificial lighting equipment as backup, and will it look natural?
A: Absolutely! I always come prepared with professional lighting equipment. This isn’t just a “backup”; it’s a crucial part of my toolkit to ensure beautiful photos no matter the conditions. I use it to supplement natural light when it’s low (like in darker reception venues or after sunset) or to improve less-than-ideal natural light (like softening harsh midday sun for family photos). My goal is always to make the lighting look as natural, soft, and flattering as possible, enhancing the scene rather than making it look obviously “flashed.”
Q13: Can we include family or bridal party group shots during golden hour?
A: It’s definitely possible, but golden hour is typically quite short, and I usually reserve that precious time primarily for your romantic portraits as a couple. The unique quality and direction of golden hour light are just magical for those intimate shots. We can certainly take beautiful family and bridal party photos at other times of the day, utilizing open shade for soft light or my lighting equipment to ensure everyone looks great. If including a few quick group shots during golden hour is very important to you, we can discuss it, but it might mean a little less time for your couple’s portraits.
Q14: How much time do we really need for golden hour photos?
A: Ideally, I love to have about 15-30 minutes with just the two of you during golden hour. This gives us enough time to utilize that beautiful, soft, directional light to capture a variety of romantic shots without feeling rushed.
Q15: Our ceremony is scheduled right in the middle of the day when the light might be harsh. What can we do?
A: That’s perfectly okay! For your ceremony photos, I’ll work with the existing light, finding the best angles. For your portraits together, if the ceremony is during a time with hard, overhead light, we’ll plan to do those portraits either during a better light window (like golden hour) or find locations with open shade to ensure the light quality is soft and flattering.
Q16: What’s more important for good photos: the time of day (affecting light direction/quality) or our chosen location?
A: Both play a role, but I often say that the quality and direction of light are paramount! A simple location can look magical in beautiful, soft, directional light. However, even a stunning location can be challenging if the light is hard and coming from an unflattering direction. Our goal is always to combine a great location with the best possible light.
Q17: If we do photos during cocktail hour, will we miss out on time with our guests?
A: I’m very mindful of your time with guests. The “kidnapping” for those special golden hour photos (with their ideal light quality and direction) is usually very short, typically just 15-20 minutes. Most couples find this is a lovely little breather, and the resulting photos are so worth it. We’ll plan it carefully!
Q18: How does the direction our ceremony or reception venue faces (north, south, east, west) affect our photos?
A: The direction your venue faces can significantly influence the natural light we have to work with!
West-facing locations are great for afternoon and evening light. If your ceremony is timed right, you could have that gorgeous golden hour sun setting behind you or to the side. We’ll definitely discuss this when looking at your venue so we can plan the best spots and timing for key photos.
North-facing areas often provide soft, indirect light throughout the day, which is consistently beautiful and flattering.
South-facing areas can get bright, direct sun for much of the day, especially in winter. This can be lovely if diffused (like through large windows or an overhang) or if it’s overcast.
East-facing spots get direct morning light. If your ceremony is early, the light can be soft and beautiful. Later in the morning, it can become harsher before the area falls into shade in the afternoon.
Q19: What’s the difference between golden hour timing in summer vs. winter for our specific location (e.g., Rochester, MN)?
A: Great question! The timing changes quite a bit. Using Rochester, Minnesota as an example:
In winter (say, mid-December), golden hour would be much later in the morning, perhaps 8:00-9:00 AM, and then very early in the afternoon, around 3:30 PM to 4:30 PM, as the sun sets much earlier. The overall daylight is shorter, but the sun stays lower, which can mean softer light for more of that limited daylight. The sunlight calculator will give us the precise times for your wedding date and location.
In summer (say, late June), golden hour might be very early, around 5:30-6:30 AM, and then again quite late, from about 8:00 PM to 9:00 PM. You have long days, but also a long stretch of potentially harsh midday sun.
Q20: If we’re having a destination wedding, how do you plan for unfamiliar lighting conditions?
A: I love destination weddings! Planning for unfamiliar light involves a few steps. First, I do thorough research using tools like the sunlight calculator for that specific latitude, longitude, and date. I also study satellite imagery (like Google Earth) to understand the venue’s orientation and any potential light obstructions. Ideally, I’ll arrive a day or two early, specifically to scout the locations at different times of day. This allows me to see firsthand how the light behaves in terms of quality and direction. My experience in various conditions and with my equipment also means I can adapt quickly to make the most of any lighting situation we encounter.
Q21: Should we consider the sunlight when choosing our ceremony time, or can you work with any schedule?
A: If you have flexibility, then yes, considering sunlight when choosing your ceremony time can be really beneficial, especially for an outdoor ceremony. Aiming for a time when the light will be softer (earlier or later in the day) or ensuring there’s ample shade can lead to more evenly lit and comfortable photos for everyone. However, please know that I can absolutely work with any schedule! If your ceremony is set during a time with more challenging light (like midday sun), I’ll use my expertise and equipment to manage it effectively, choosing the best angles and possibly using fill flash for group photos. Often, we can schedule your main couple portraits for a time with more ideal light, even if the ceremony itself is at a different time. Open communication is key, and we’ll create the best plan together!
Don’t forget our other planning resources and tools.
We’ve created this page as one of many helpful resources for our brides and grooms.
Planning your engagement session? Dive into our guides on choosing the perfect locations in Rochester, Twin Cities, discovering creative ideas, and finding tips on what to wear.
For your wedding day, a well-structured timeline is absolutely key! We invite you to use our timeline builder, check our suggestions for timing each part of the day, and see an example of a 10-hour coverage schedule.
Ready to plan your perfectly lit wedding photos? Contact us today!